Sunday 30 September 2012

Current Projects; Part 1 (Halo helmets)

Two projects that I have had on the go for quite some time now are a couple of helmets from Halo, the Mk VI and CQB. Both are made from pepakura which was fiberglassed for strength, and they are now in the smoothing and detailing stage.

MK VI
This helmet is very near completion now, and only really needs a little more work with bog, and then a few passes with spot filler. All the raised details where added on part way through construction as they were not included in the pepakura file I used. They were made with 1 and 2mm card, which was coated in resin for durability.


CQB
This helmet is not quite so far along as the other, and still needs a fair amount more detailing yet. Details will be added with card as was done on the Mk VI helmet, and the three knobs on the helmet will be removed, a master will be made them molded and cast, in order to get three identical pieces.
I have some images of this helmet in the early stages, after it had been fiberglassed, but before I had started to apply bog.

Both of these helmets are at home so I only get a chance to work on them when I am back visiting over the uni breaks. However while I am there I get quite a bit done on them as I don't have anything else to work on.

Thursday 20 September 2012

Projects Past: Part 10 (Jango Fett v 1.1)

In the intervening time since Auckland Armageddon in '09 I have been slowly working toward making my Jango Fett costume more screen accurate. The biggest alterations are the new, larger and more accurate gauntlets and the jetpack as well as weathering and other small bits and pieces.
Both the gauntlets and jetpack were constructed from 1mm and 2mm card, which was then fiberglassed for strength and detailed with bog.

Cardboard base for the gauntlets
Comparison with the old gauntlets;
The new gauntlets are the two in the middle.
I also scratch built a mini rocket to go on the left gauntlet
These were all then painted up and weathered appropriately.

The rocket body under construction

Smoothing and detailing;

I used expanding foam to fill some of the captivates to help add strength, without making the jetpack too heavy.

I don't have any good photos of the finished jet pack but these photos are of the whole costume in it's current state.
 This one was taken at Auckland Armageddon last year with some members of Outpost 42, the local contingent of the 501st.


This photo was taken in July this year at an event for disadvantaged and disabled children, again with a member of Outpost 42.

Finally this photo was taken a month and a half ago at a photoshoot with a professional photographer. There are still a few more details that need to be changed/altered before this costume will be finished so stay tuned for updates on it in the next few months or so.

Tuesday 18 September 2012

Projects Past; Part 9 (300 Spartan)

While at high school I had a really good friendship with one of the teachers who taught me English for two years and then Classical studies for two more. Near the end of my last year I decided to make a Spartan helmet from the movie 300, to gift to him. All up it took me less than 2 weeks from start to finish. I started by looking at reference images from the film and made a template in cardstock. The template was then transfered onto corrugated card, which was shaped and assembled with hotglue. It was then fiberglassed for strength and bog was used to smooth it out.
As with the War Machine helmet, I then sanded it, then primed it so show the imperfections, applied more bog, sanded, prime etc until it was nice and smooth.
Once it was all smoothed out to my satisfaction the final step was to paint it up so it looked used and dirty.
Again I looked at reference images to see how the weathering was done for the movies and replicated that on my helmet. I also added a blood splatter across the face for good effect.

Eventually I will revisit this and build one for myself, using what I learnt building this one, and I will add more 3 dimensional details to make it look more like it has been forged, and some scratches and gouges for battle damage.

Monday 17 September 2012

Projects Past; Part 8 (War Machine Helmet)

Around the time leading up to the release of the Iron Man 2 movie I decided to make a War Machine helmet to wear to the release. I found a pepakura file for the helmet, and although it was very basic, given the amount of time I had I decided to use it.
Once I had printed it out, cut out all the pieces, and glues them together the next step was to fiberglass the card model to strengthen it.
Then the next stage was to smooth it out with automotive body filler or 'bog'. This process consisted of doing the bulk of the smoothing, then giving it a coat of primer to show up the imperfections, then apply more bog and sand, the prime, bog and sand etc.
The final step was to paint it to look like War Machine. I also cut out a segment at the back of the helmet, and used neodymium magnets to hold it in place.
From start to finish this took me about a week and a half, which shows in the final result.

At some point in the future I will revisit this build, in order to add all the details that got left out and reshape the parts of the helmet that I'm not happy with.

Sunday 16 September 2012

Projects Past; Part 7 (Nazgul/ Ring Wraith)

For Wellington Armageddon on 2010 I decided I wanted to make another costume to wear, besides my Jango Fett, and I settled on a Nazgul from Lord of the Rings, (also known as Ring Wraiths or Black Riders). I started out by doing research on the costume and getting as many screen shots as I possibly could. I found a bunch or really helpful sites when it came to the robes, but at the time decent reference pictures of the gauntlets were hard to find.
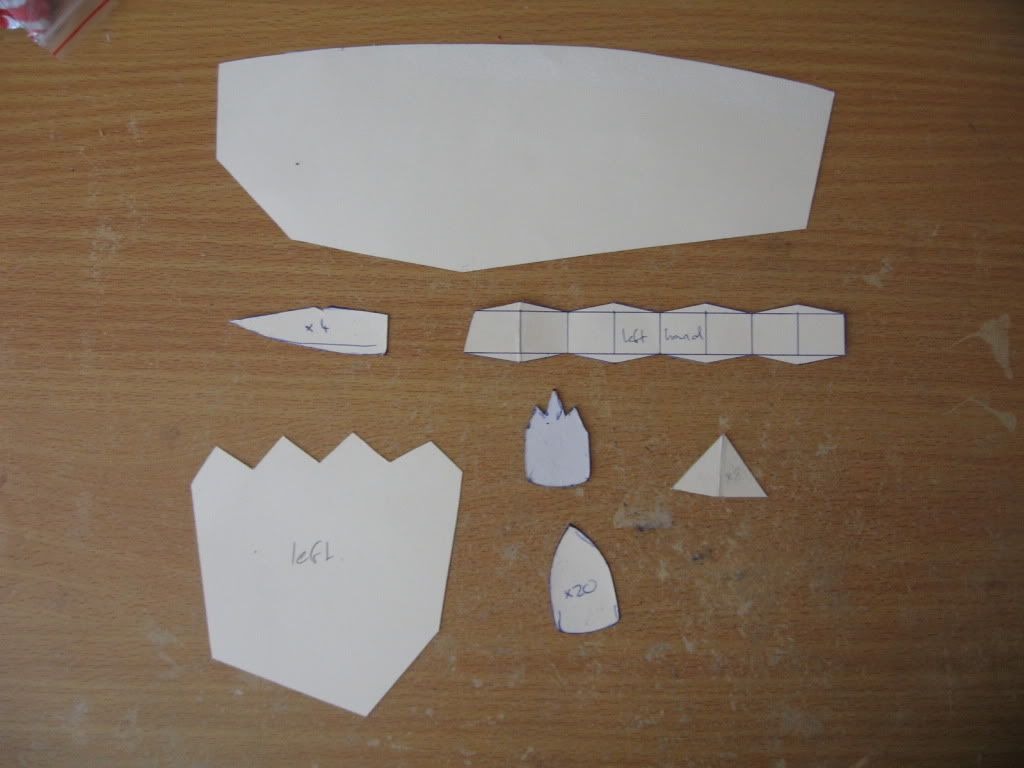
In the end I found a couple that were passable, so started making the gloves. The finger pieces were made from cardstock, coated in resin. Each piece was cut out individually, I needed about 60 parts for the gloves, but ended up making quite a few spares as I wasn't sure how well they would hold up.
They were temporarily attached to a piece of bamboo prior to being coated in resin in order to give them a bit of curvature.

The rest of the gauntlets were constructed from 2mm cardboard, which was then fiberglassed for strength.
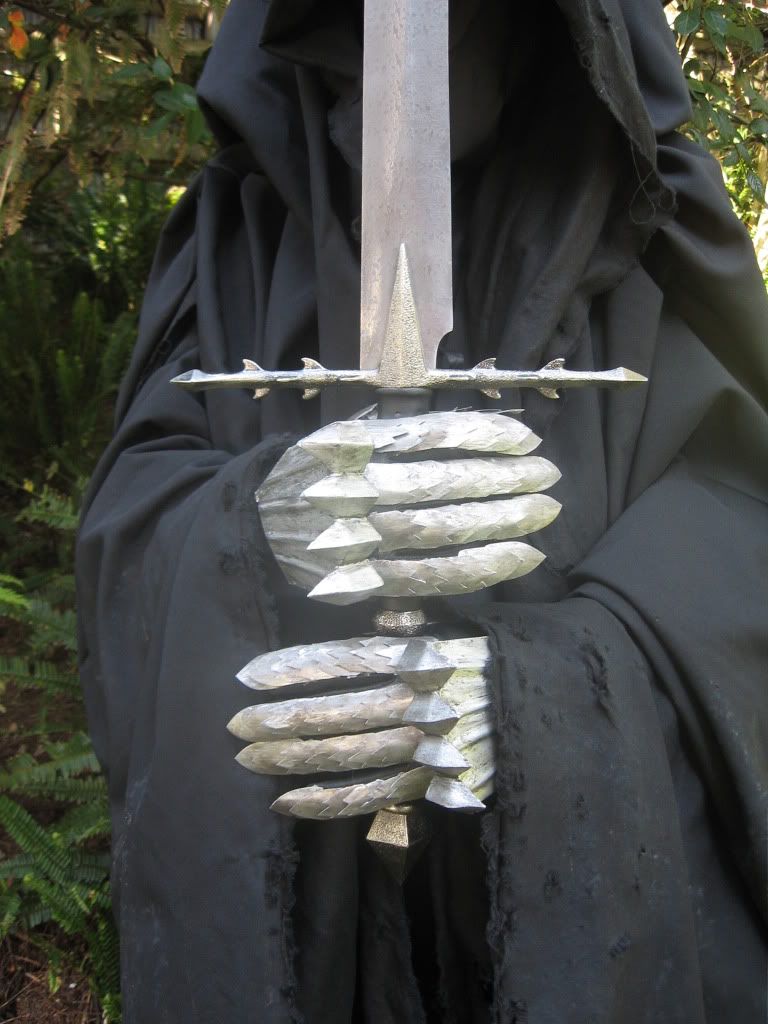
It was all then given a based coat of silver, and weathered to look beaten and dirty.
Resulting in this


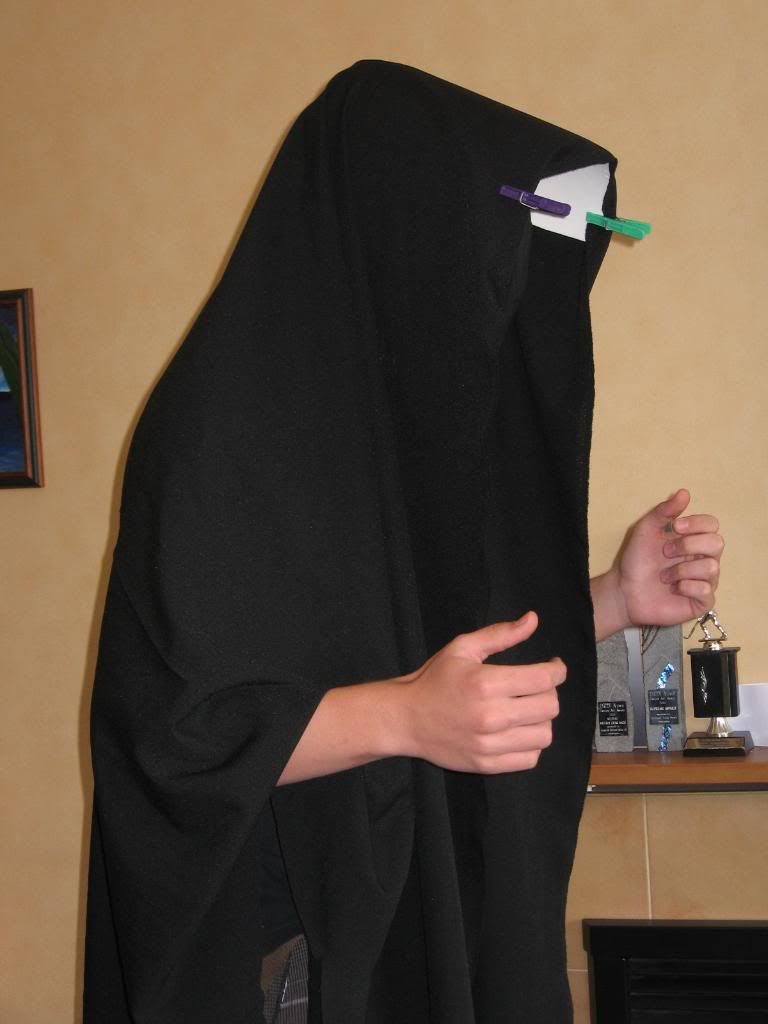
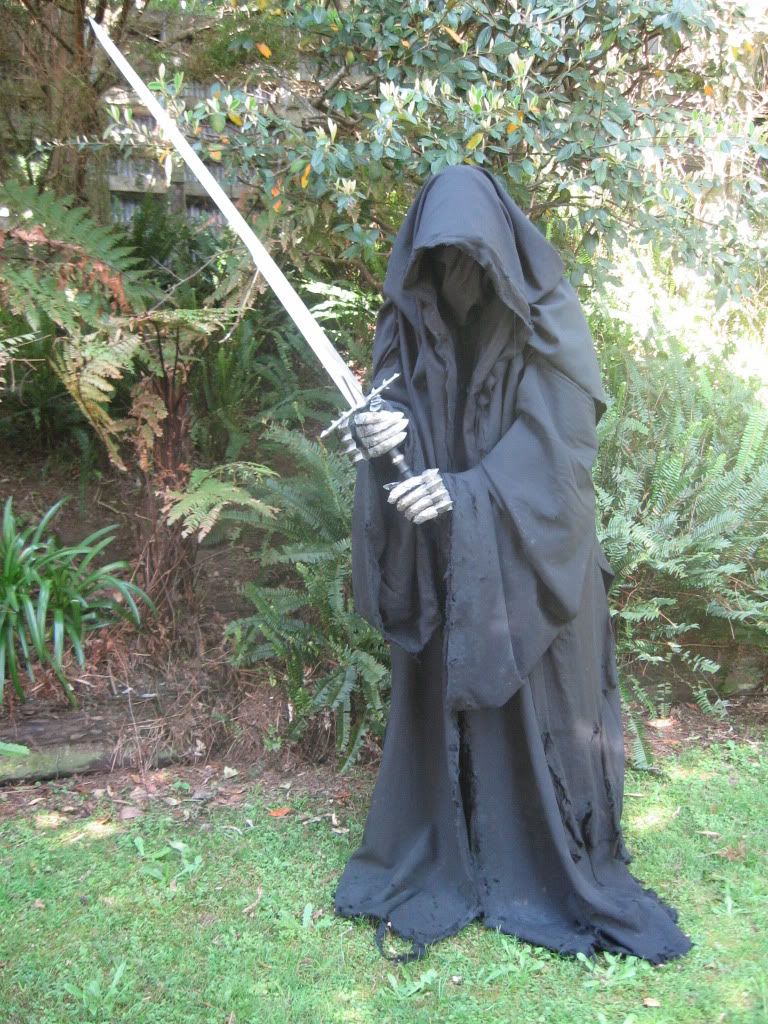
 For the robes, I needed to cheat slightly, the original costumes had about 50m of fabrics in them and about 7 or 8 layers, which was going to be far too expensive and impractical for me to do. I cut it down to 4 layers in the end, The inner robe, over cloak (with sleeves), sleeveless cloak, hood and shawl. For most of the layers a heavily modified dressing gown pattern was used, with several different fabrics.

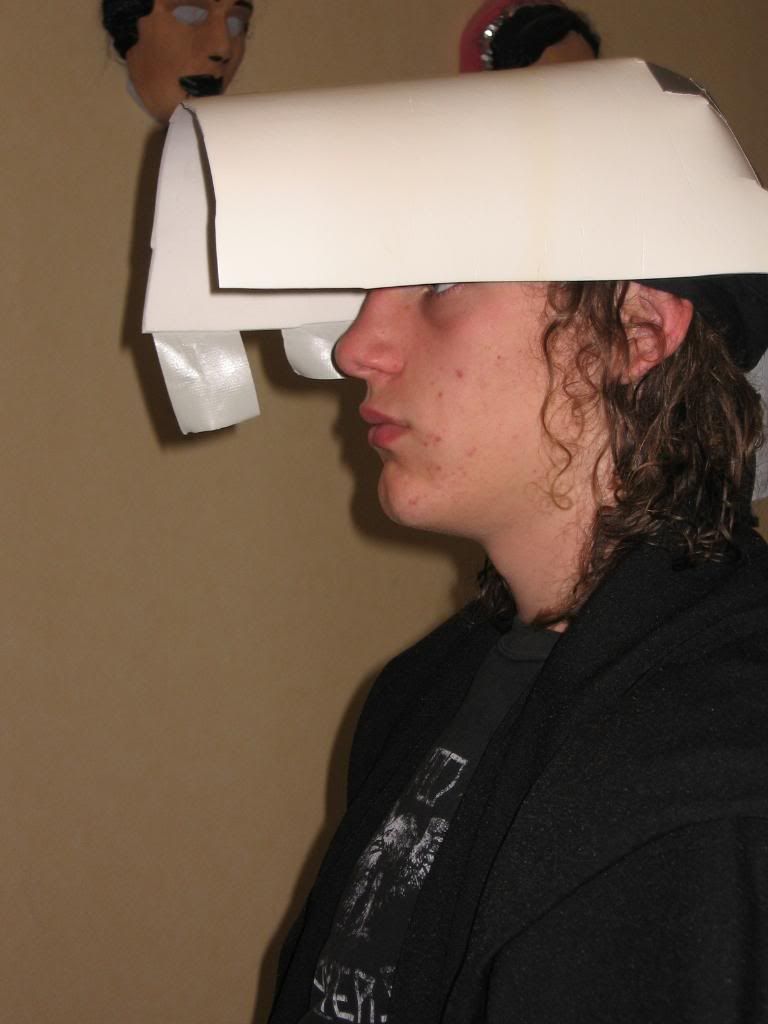
The hood was a little more challenging, as it needed to hold it's own shape, and stick out past my face quite a way. In the end foam was used to create a semi rigid form the fabric could drape over like so
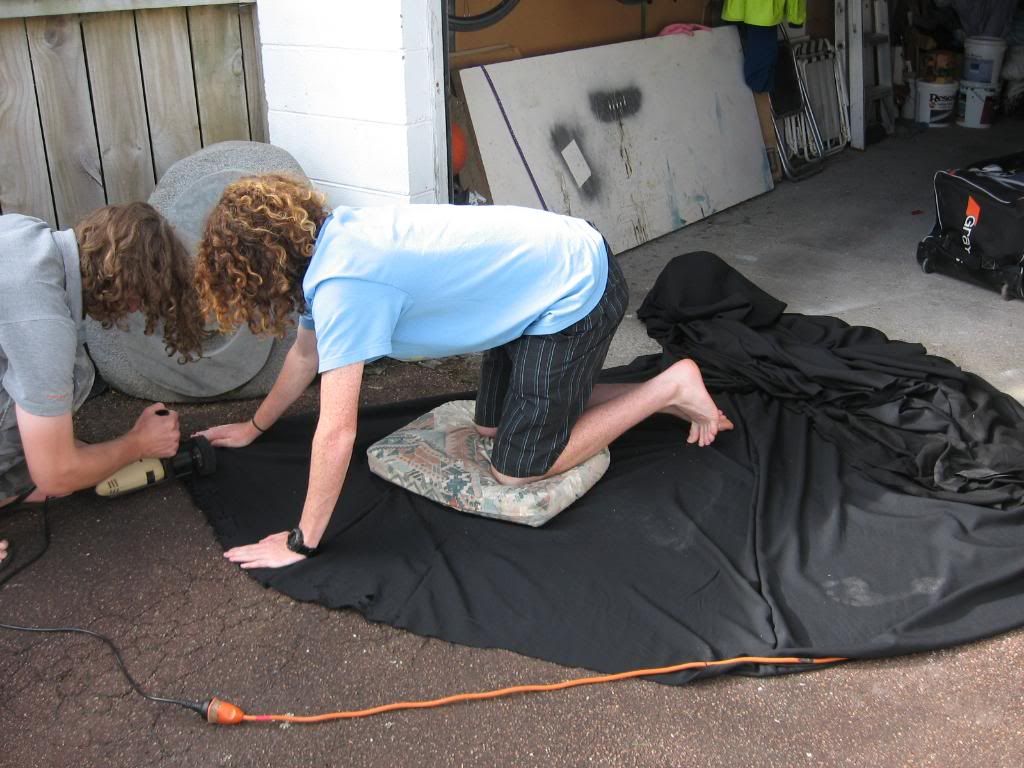
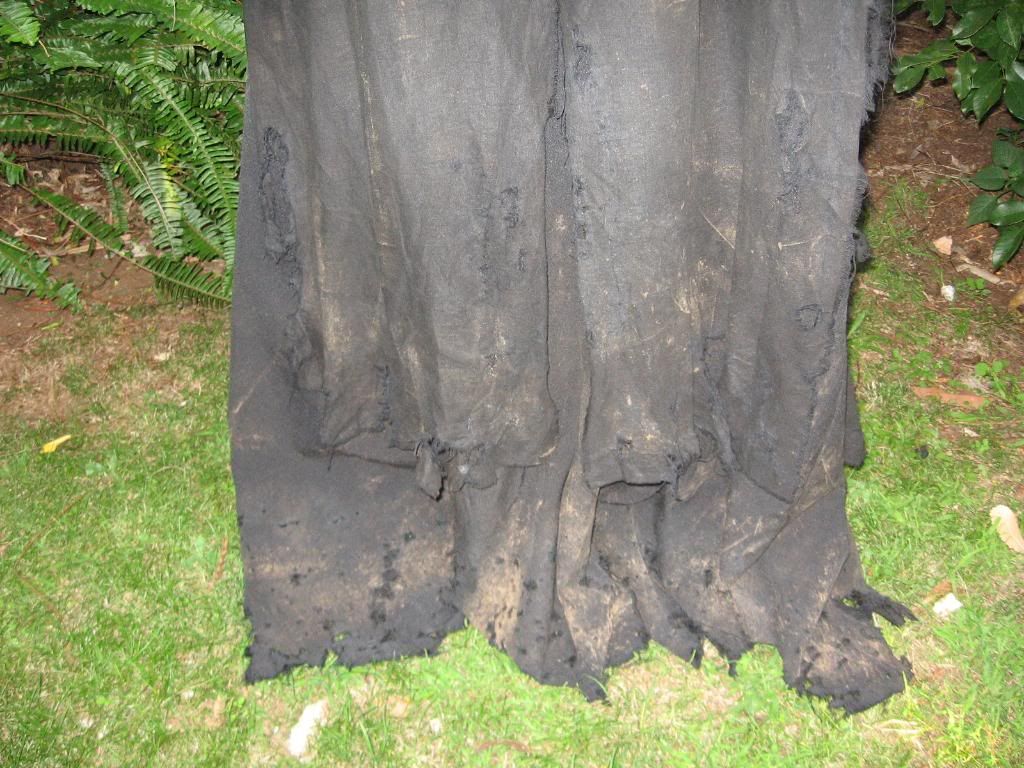
 A rust stripping attachment was used to rip the edges of the fabric ( I enlisted a friend to help with this part) and dirt was rubbed on it to make it look appropriately worn.

With the result being this


And I bought a movie replica sword to complete the costume


 For Wellington Armageddon the next year I decided that it would be beneficial to the costume I added some boot armour as I notice in a couple of photos my the boots I was wearing were a little bit visible.

They were made in much the same way as the rest of the armour, being made from cardboard, which was then fiberglassed for strength then smoothed with body filler and painted up.